

This entry is the first of two parts on microphone techniques in concert settings. The first topic is special considerations for live sound reproduction.
There are several good guides available that describe basic microphone techniques. I recommend the Shure guide especially:
It’s comprehensive but rather technical in the beginning. The end of the guide has good notes on microphone placement on various instruments.
Let’s consider in some depth topics that were raised in the Shure guide, but not fully explored in how they relate to live sound techniques and selection of microphone polar pattern:
- Polar pattern and critical distance
- Polar pattern and proximity effect
- Stage volume
- Boundary effect
- Phase cancellation and polarity
The basic goal in live sound reproduction is gain before feedback (“GBF”). The objective of the live sound technician is to maximize that figure while maintaining natural tone for each instrument. GBF is a function of stage layout, desired stage volume, acoustics of the hall, and the polar pattern and placement of the microphone. GBF is also a function of frequency, because a given combination of those factors will result in varying frequency response. That’s a lot of factors! Let’s consider each.
Distance factors
The critical distance is the point at which ambient and direct sound are equal. The Shure guide describes that as an absolute, which is really saying that it is a pressure measurement, or stated another way, the critical distance for an omnidirectional microphone. For other polar patterns, their critical distance will be further from the source: 1.7x for cardioid, 2x for hypercardioid.
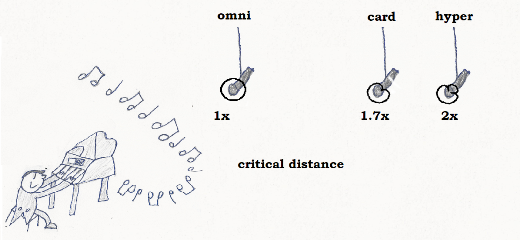
Desired placements should generally be well inside the critical distance; the distance factors given should be applied at the distance required for desired GBF, not a balance of direct and ambient sound. Rather, the concept of distance factors in live sound is important when considering the required distance from the source: a hypercardioid microphone may be twice as far from a source as an omnidirectional microphone, while potentially having the same GBF. Thus, where microphones can be placed directly on a source (as with an instrument-mounted microphone), omnidirectional microphones may provide adequate GBF, but for any microphone that must be 25cm or more from a source, directional microphones will likely be required where significant off-axis sound must be rejected.
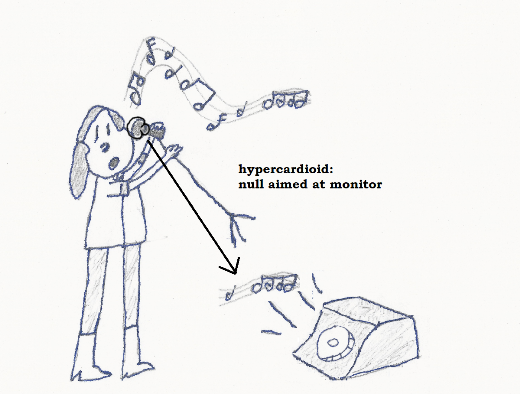
That concept covers only ambient sound, and doesn’t fully consider other close sources that must be rejected. In those situations, the polar pattern may need to be selected for its angle of greatest rejection, rather than its overall rejection of randomly incident ambient sound. The classic application is a supercardioid or hypercardioid vocal microphone where the null is aimed a stage monitor.
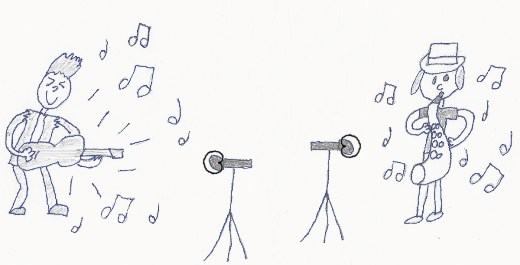
However, there are many other potential applications. Here cardioid microphones are used where horizontally opposed musicians must be isolated:
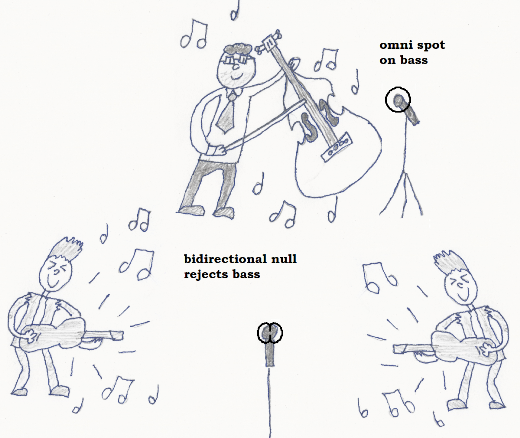
A bidirectional microphone can be employed where two musicians must share one microphone (note that one will have opposite polarity to the other), or where another source perpendicular to the direct sound must be rejected.
So while it might initially seem that hypercardioid microphones are always the best choice for maximum GBF, there are many exceptions.
Polar pattern, frequency response and proximity effect
Where does that leave the omnidirectional microphone? Does it have application on stage? Yes, indeed! In some cases, omnis are the best solution.
First, we need to acknowledge that no microphone is a perfect representation of its nominal polar pattern: cardioid microphones tend to become super- and hypercardioid at high frequencies, and become omnidirectional at low frequencies. Bidirectional microphones can have excellent consistency of polar pattern by frequency, but due to their pattern their stage application is limited.
True pressure omnidirectional microphones will maintain a very good omnidirectional response, but at high frequencies will become slightly directional, approximating a subcardioid pattern. The frequency at which that transition occurs is a function of the diaphragm (or case) size of the microphone. That effect can be exploited for concert recording, but generally isn’t a concern for live sound.
The main advantage of omnidirectional microphones in live sound reproduction is that their frequency response does not vary by distance. In contrast, this is a characteristic of all directional microphones. Called proximity effect; it is an increase in low frequency response in a directional microphone as the distance to the source decreases. This is why a male voice sounds much fuller when the vocalist “eats” the microphone; but on an instrument, a close placement can yield an undesirably boomy tone.
Both farfield low-frequency response and proximity effect are functions of polar pattern. Generally, as the pattern gets more directional, it will have less farfield low frequency response and a larger increase in low frequency response with proximity.
Again, these are effects that can be exploited: an omnidirectional, cardioid, and hypercardioid microphone may be placed at distances where their low frequency response for the nearfield direct sound—the desired source—are the same (generally, they would all be within 25cm or less from the source), but as a result of their polar pattern, their farfield low frequency response will be very different. In the case where there is an adjacent instrument with significant low frequency output that must be rejected, a hypercardioid microphone placed close to the source may provide the best farfield rejection of low frequency “bleed”.
Wait, that sounded like another argument in favor of hypercardioid microphones for live sound, didn’t it? Yes! But what happens if the placement for the desired low frequency response on the source is still too far for adequate GBF? The omnidirectional microphone can be placed directly on the instrument without any increase in low frequency response—which the hypercardioid microphone can’t do. In that case, it might be a choice between low frequency bleed between instrument channels and inadequate GBF, which is generally a more significant issue.

Stage volume
The next application for omnidirectional microphones is the growing popularity of single-microphone stage plots, especially in bluegrass and other forms of traditional acoustic music. Here, the microphone will be in the farfield (>1m) for the majority of musicians most of the time, until they step forward to sing or solo. This technique strongly suggests that there be no stage monitors.
Another option is a cardioid microphone, but that will require spot microphones or pickups on bass instruments as the cardioid microphone will typically have inadequate farfield low-frequency response.
Thus, as the volume of stage monitoring decreases and the requirement for isolation of instruments is relaxed, omnidirectional microphones become the choice for the best possible natural response according to the acoustic balance of the ensemble. Ultimately, the best microphone is no microphone at all! But where amplification for the house is required, if omnidirectional microphones can be used, they will generally have the best tone.
Boundary effect
Boundary effect is an increase in sound pressure at a surface. It is a frequency-dependent effect, according to the size of and distance from the surface. As the size of the surface increases, the effect extends to progressively lower frequencies. As the distance from the surface increases, the effect occurs only at lower frequencies. If a microphone is placed near but not on a surface, there will be phase cancellation from reflections from the surface above a low-frequency cutoff point, according to distance. This creates an undesirable comb filtering effect, where some frequencies are boosted and others cut. Boundary microphones are thus designed to be placed directly on a surface (which is a reflection-free zone!), so that only the size of the boundary affects the frequency response of the microphone. Thus, the size of the surface is intended to be large, such as a stage floor. An outstanding application for the boundary technique is on the underside of a grand piano lid.
Smaller surfaces also will cause a boundary effect, whether desirable or not. Thus, when placing a microphone on an instrument with a significantly large surface, such as guitar or string bass, the microphone should be placed either directly on the soundboard or at a distance sufficient to avoid undesirable comb filtering. When using directional microphones, the combination of boundary effect and proximity effect can cause sudden and drastic changes in frequency response if the distance between the instrument and microphone is not fixed!
Phase cancellation and polarity
With multiple instruments, multiple monitors, reflective halls, and a variety of microphone types employed, the phase relationships of all of these factors gets quite complex. To minimize undesired phase cancellation, the usual “rule-of-thumb” for microphones in live sound is to place each microphone at least three times as far from another source as the intended source.
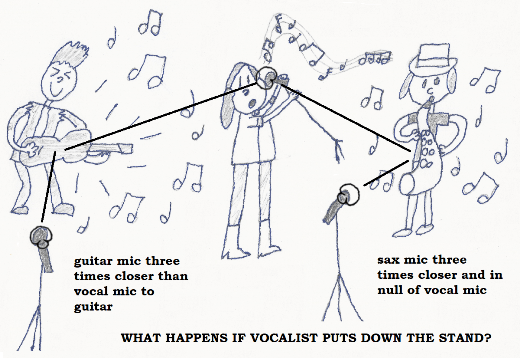
This is the “3:1” rule; nominally, that would result in any off-axis source attenuated -10dB with respect to the level of that source at its own microphone, such that when mixed into the PA system, off-axis signals will not create audible phase cancellation.
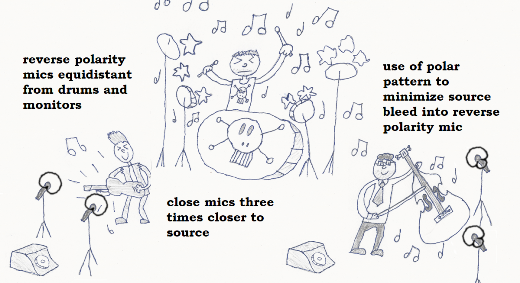
An interesting corollary to that rule exploits the difference between signal and ambient noise by using two microphones per source to eliminate the ambient signal in both by reversing the polarity of one microphone. This was most famously done by the Grateful Dead in their “Wall of Sound” system, where they used a single system for both mains and monitors, placed behind the stage. With two microphones per source, the 3:1 rule must be strictly obeyed; ideally the “source” microphone would be even closer. The “ambient” microphone must be placed far enough away to not receive a significant amount of direct signal, but close enough such that the ambient signal is substantially the same.
The Dead abandoned the Wall of Sound because of the unwieldy size of the speaker system—as improvements were made in live sound reinforcement equipment, the benefits of the Wall became redundant. The dual-microphone technique also fell out of common use, as stage monitoring for mainly electric instrument acts (or in-ear monitoring) does not require that degree of complexity.
Perhaps with the popular revival of acoustic acts, the time has come for reconsideration of the dual-microphone technique. Acoustic musicians regularly employ pickups for adequate stage volume, but the tone of pickups is still usually regarded as inferior to microphones. “Blend” system products that employ both microphones and pickups have attempted to address that issue. Could a dual-microphone system be more effective?
Naiant solutions for live sound reinforcement
The X-R microphone system offers a full range of small capsule polar patterns. The hypercardioid and nearfield cardioid capsules are designed to provide natural tone when close-micing instruments while providing excellent rejection of off-axis sources and farfield low-frequency sources. The X-R system offers instrument mount solutions with a magnet mount for soundboard (guitar, cello, or string bass), a violin/viola/mandolin mount, and a table mount for boundary applications. There is also a 1/4″ thread mount which is compatible with a wide range of third-party mounting solutions.is
The X-R system can provide a single-point solution for the dual-microphone ambient sound cancellation technique. When a dual-capsule input X-R microphone body is connected to a single mono microphone channel, its two capsule inputs will be input into opposite polarity leads at the microphone preamplifer. By mounting the X-R body on a stand near the instrument, one capsule may be remote from the X-R with an extension cable, and mounted on or very close to the instrument. The “ambient” capsule is mounted directly on the X-R body on a stand. The resulting reduction in ambient sound and increase in GBF can be dramatic!
Once microphones are selected, the various factors involved with the stage environment create a complex sensitivity to gain that is frequency-dependent. The standard procedure is to set all microphones for best possible GBF, then to “ring out” the system by increasing gain until feedback occurs, then reducing the sensitivity of the system via equalization at that frequency. The procedure is repeated until further gain is no longer required or feasible.
Smaller sound mixers often don’t have precise tools for equalization; typically a three-band equalizer per channel, perhaps with a sweepable mid, and an octave-band graphic equalizer for the stereo main output. The channel midrange equalizer’s quality factor (“Q”) is typically too small (that is, wideband) to effectively notch problem frequencies without damping desired frequency response.
The VPD filter addresses this shortcoming; containing a narrow notch filter with selectable frequency, it is effective at increasing GBF while leaving the mixer’s midrange free for general tonal shaping. The VPD is also available in a three-band EQ version, combining the midrange notch filter with low- and high-cut filters for general tonal shaping.
